by Jesús Zabala - 7 min read
How to Tie a Choker Chain
No, this tutorial is not about dog chains. It's about a fashionable accessory that has taken the style world by storm - choker chains! If you've been curious about how to tie a choker chain and rock that trendy, neck-hugging look, you're in for a treat.
Today, I'll guide you through various techniques and step-by-step instructions to help you become a choker-tying pro.
Whether you're a newbie or looking to up your choker game, get ready to unleash your creativity and elevate your choker necklace game!
So, gather the necessary equipment, and let's dive in!
How to Tie a Choker Chain: The Ultimate Guide
At JewelryLab, we understand that tying a choker chain can be exciting yet daunting for beginners. The good news is that the various ways to tie a choker chain allow you to explore your creativity and personalize your style.
If you want to add a pinch of personality, I suggest you check out our exclusive men's choker chain with pendant. This piece will definitely catch other people’s attention. Bonus points for being an excellent conversation starter. After all, experimenting is the key component to figuring out your style!
Let's dive into some common ways to tie a choker.

Method 1: classic knot
What you'll need for this tutorial:
- Choker necklace of your choice
- Scissors (optional)
Step 1. Measure and cut the choker chain
Start by measuring the choker chain around your neck to determine the length. Add a few extra inches to ensure a comfortable fit. Use scissors to cut the chain to the desired size.
Step 2. Wrap around and cross the ends
Wrap the choker chain around your neck, ensuring the ends meet at the center. Cross the ends over each other, creating an "X" shape at the back of your neck. The length of the ends should be equal.
Step 3. Tie a simple knot
With the crossed ends of the chain, bring the right end over the left end, forming a loop with the right end. Pass the right end through the loop from underneath, pulling it gently to create a knot. Ensure the knot is snug but not too tight, allowing for comfort and adjustability.
Step 4. Adjust the fit
After tying the knot, adjust the choker around your neck to achieve the desired fit. Ensure the choker sits comfortably and securely without being too tight or loose. You can also gently pull on the ends of the chain to adjust the necklace length if needed.
Method 2: Bow Tie
What you'll need for this tutorial:
- Choker chain necklace of your choice
- Scissors (optional)
Please note: The initial steps (Sep 1 and Step 2) remain consistent across all our tutorials. Therefore, it's important to remember that when attempting these techniques at home.
Step 1. Tie a bow
Now, let's tie a bow with the choker. With the crossed ends of the chain, take the right end and form a loop by folding it over itself. The loop should resemble a "bunny ear" or half of a bow. Hold the loop securely.
Step 2. Create the second loop
Next, take the left end and form a second loop similar in size and shape to the first one. This loop should be right next to the first loop, creating the other half of the bow.
Step 3: Tie it up
Cross the right loop over the left one as you would when tying your shoelaces. Pass the right loop through the opening created by the left loop, pulling it tight. Adjust the size and symmetry of the bow until you are satisfied with the appearance.
Method 3: Double Knot
What you'll need for this tutorial:
- Choker chain of your choice
- Scissors (optional)
Step 1. Tie a double knot
To tie the choker chain with a double knot, take the right end and bring it over the left end, creating a loop. Pass the right end through the loop from underneath, pulling it gently to tighten the first knot. This forms the first part of the double knot.
Step 2. Cross and tie the second knot
Cross the left over the right end, creating a second loop. Pass the right end through the loop from underneath, as you did in the previous step. Pull both ends gently to tighten it.
Method 4: Sliding Knot
What you'll need for this tutorial:
- Choker chain of your choice
- Scissors (optional)
Step 1. Create a loop
After deciding the chain size, take one end of the choker chain and form a loop. This will leave the tail of the choker hanging down. The loop size depends on the desired tightness of the choker. The longer the loop, the looser the choker will be.
Step 2. Pass the choker tail through the loop
Take the tail of the choker chain and pass it through the loop, creating a second loop. This loop will serve as a sliding mechanism for adjusting the choker.
Step 3. Pull to tighten
Hold the choker chain near the loops with one hand and gently pull the tail with the other. This will tighten the loops and secure the choker in place. Make sure the choker is snug but still comfortable to wear.
Step 4. Slide to adjust
To adjust the size of the choker, hold onto the loops and slide the tail up or down. This sliding motion allows you to make the choker tighter or looser. Keep adjusting until you find the perfect fit.
Step 5. Trim any excess
If there is a long tail of chain left, you can trim it with the scissors. It's best to leave out a small amount of chain to maintain the sliding functionality of the knot.
Method 5: Chain Extender
What you'll need for this tutorial:
- Choker chain of your choice
- Chain extender
- Lobster clasp or jump rings
- Pliers (optional)
Step 1. Attach the chain extender
After cutting the choker, take the chain extender and open the lobster clasp or jump ring on one end. Connect it to one end of the choker chain, ensuring it's securely fastened. If you’re using jump rings, you may need pliers to open and close them.
Step 2. Connect the choker chain to the extender
On the other end of the chain extender, open the lobster clasp or jump ring and connect it to the opposite end of the choker chain.
Step 3. Adjust the length
The chain extender provides additional length to the choker chain. Use the extender to adjust the size of the choker to your desired fit. Sliding the lobster clasp or jump ring along the extender can make it shorter or longer.
Step 4. Secure and check the fit
Fasten the choker with the lobster clasp or jump ring. Check the fit around your neck to ensure it's comfortable and sitting at the desired position.
Tips and Tricks for Choosing Choker Necklaces
Now that you know how to tie a choker chain, it's time to take your skills to the next level with expert tips and tricks. Tying a choker necklace is just the beginning, as numerous ways exist to enhance its style, comfort, and versatility. Let's take a look at the tips.
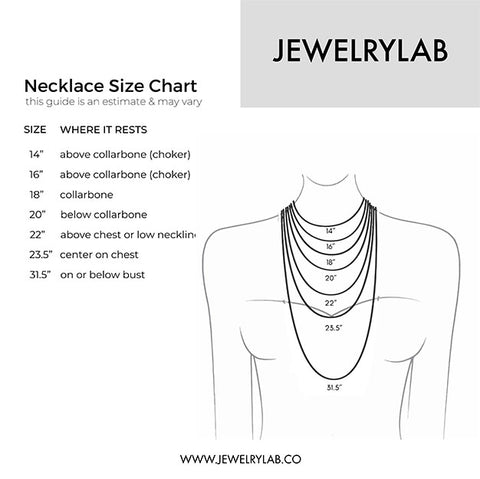
Choose the right length for your neck
Choosing the right size is important for both comfort and style. A well-fitted choker enhances your neckline and adds a touch of elegance to any outfit.
Too tight, and it can feel constricting and uncomfortable, while if it’s too loose, it may not have the desired impact or may even slip off. To find the perfect size, consider measuring the circumference of your neck and adding a few inches for a comfortable fit.
The width of the choker is also important. Wider chokers may require a slightly looser fit.
Experiment with different materials and styles
Chokers come in various materials, including velvet, leather, metal, and lace. Each material has a different texture, feel, and visual appeal, allowing you to explore different aesthetics and moods.
Chokers can be minimalist, bohemian, edgy, or elegant. They suit any occasion or personal preference, and you can create looks that reflect your individuality.
Step outside your comfort zone. The beauty of chokers lies in their ability to transform an outfit and make a bold statement, so embrace the variety and let your creativity shine through as you explore the world of chokers.
Attach charms or pendants
Adding charms or pendants to your choker gives a personalized touch. Charms and pendants can be meaningful symbols, gemstones, initials, or any other decorative element that resonates with your style and personality.
Incorporating these accessories allows you to tell a story, showcase your interests, or convey a special meaning. They allow you to customize your choker to suit different occasions, from casual outings to formal events.
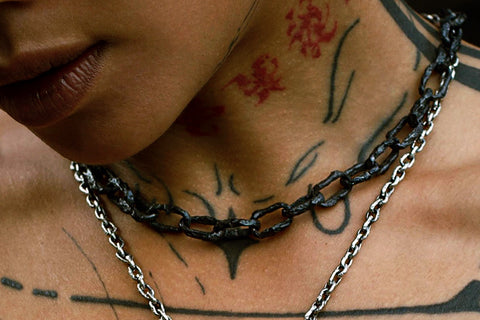
Mix and match with other necklaces
Mixing a choker with other necklaces can create a dynamic and eye-catching layered look that adds depth and dimension to your overall style. When combined with longer necklaces or pendant chains, a choker becomes a focal point that adds a touch of sophistication to your ensemble.
By playing with different lengths, textures, and styles, you can achieve a harmonious blend of jewelry that complements each piece and enhances your outfit. You can combine delicate chains with statement pieces, mix metals or materials, or even incorporate different pendant designs.
Experiment with layering your choker with other necklaces, and let your imagination guide you in curating a truly unique look.
Conclusion
By following my instructions, you can make unique choker styles that suit your preferences and individuality.
Remember, tying a choker chain is about securing it around your neck and embracing creativity and personal expression. The possibilities are endless!
Now that you know how to tie a choker chain, it's time to incorporate this fashionable accessory and make a statement. Have fun!


-
 DESIGNED & HANDMADE IN BALI
-
 FREE RESIZING FOR EVERY PIECE
-
 FREE SHIPPING ON $150+ ORDERS
-
 100% SAFE & SECURE CHECKOUT


